Snake in JavaFX (Part 1)
Intro
Programming games is one of the most fun areas of software development to me. Apart from the design of new game mechanics and fictitious worlds, I find the technical challenges very rewarding and a good practice for programming in general. Surely I wouldn’t need to program these arcade classics myself if I just wanted to play them, since there are many versions of them playable online for free, but I see this similar to coding katas, where the focus is more on the challenge itself and the techniques and different ways of solving it.
My focus is on explaining to other developers of all experience levels my thought processes and techniques that I apply when programming such a game, and help newer developers and those who want to become one with the fundamentals of game programming and software development in general. At the same time, I intend to use the opportunity to practice different technologies, maybe even try new ones.
Preparation
Concept
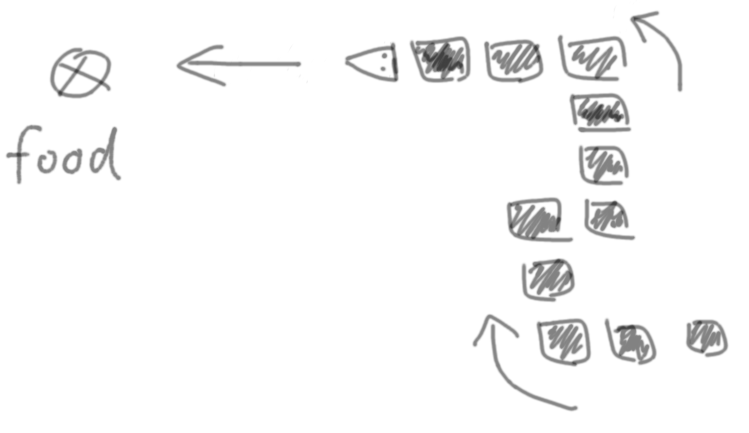
In case you’re not familiar with the classic Snake game, here’s the general idea:
- Food spawns randomly on the screen.
- You steer the snake toward the food.
- The snake consists of individual segments or blocks, each one taking the place of its predecessor on each step.
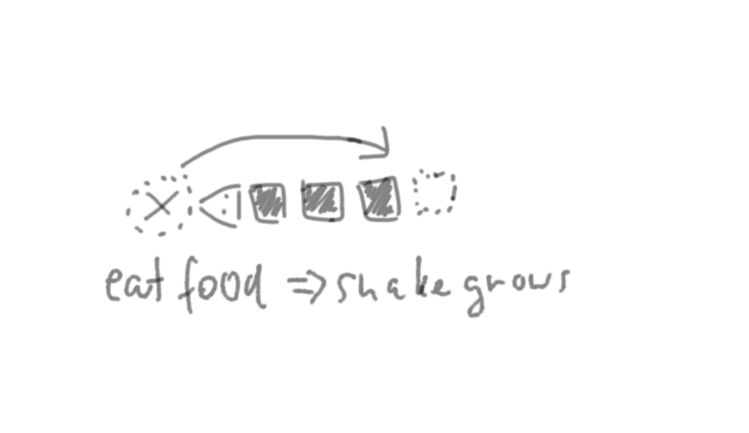
- Upon eating the food, the snake grows by one segment.
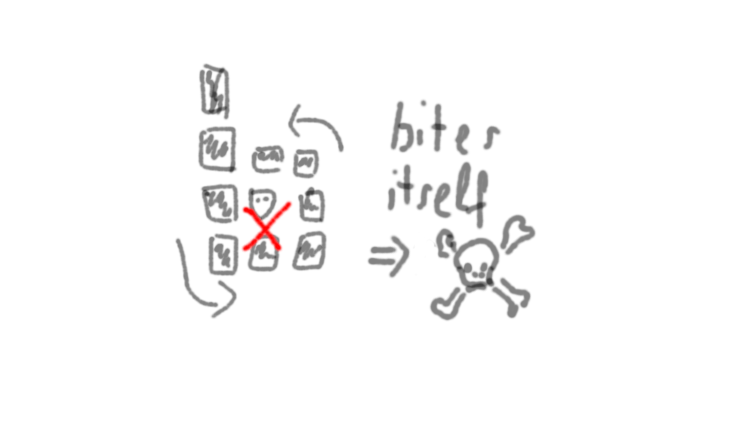
- As the snake grows in length, it gets more and more difficult to avoid biting its own tail, thus losing the game.
- The amount of food eaten, or the length of the snake, can be tracked as a score.
Choosing a technology
Since I want to put the focus on (game) programming techniques and thought processes, I want to use a thin layer of existing technology for player IO (keyboard input and graphics output). While we could use a game engine like Unity, which I used for many years in both commercial and private projects, that seems unnecessary for a simple game like snake. I want to use something for simple graphics output and then draw the graphics using code on a virtual canvas.
A few possible technologies come to mind: I could do it inside a browser using HTML and then implement the logic using JavaScript or TypeScript, or a library like Swing or JavaFX to create a cross-platform desktop application. Of course there are many more possibilities.
For this project I will choose JavaFX, create a very simple window with a canvas in it, and draw the graphics using Java code. Maybe I will redo the same project some other time with a different graphics technology and programming language, like maybe in C# using WPF, or in C++ with OpenGL or Vulkan, or even in Electron for a web-based desktop UI.
Creating a local Git repository
I often use local Git repositories, even when I never intend to share them with others. The ability to work in small steps and be able to iterate and go back is invaluable, but I know many (especially new) developers would either begin with a new repo on GitHub or another hoster and then clone it locally, or just have their local project folder without version control (I was like that myself a few years ago).
I will show you how I start with a local Git repository and add it to GitHub later on (in this case to link it here for you to try it out and even follow along with the individual commits if you like), because this teaches some fundamental Git concepts concerning Git repositories and remotes that many beginners struggle with.
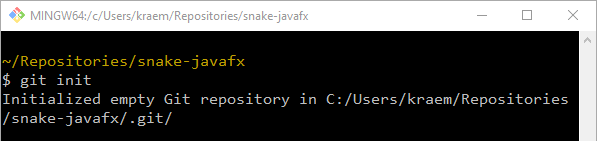
I start with an empty folder that I call snake-javafx. This will be the repository root. If you are used to creating new repositories on GitHub and then only cloning them, you might be unfamiliar with this process. In the empty folder, I open Git Bash and run git init. This creates a new repository inside that folder.
Creating a JavaFX project
Using IntelliJ’s project wizard, I create a new JavaFX project inside the empty Git repository. IntelliJ warns that the folder is not empty because we already created a Git repository, so we can safely ignore the warning. It’s just making sure we are actually doing so intentionally.
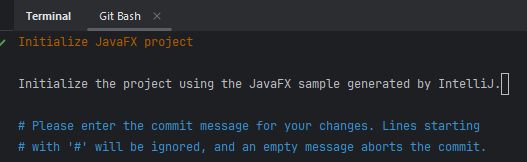
This generates a “Hello, world!”-like sample application with a button that lets some example text appear on click. This is handy to get going quickly, although I will of course delete all of the example content and use only the basic scaffolding. But before I hollow out the sample app, this is the time for my first commit. Thus, if anything goes wrong when preparing the sample code for my purposes, I can quickly go back to a consistent state with a working JavaFX application.
The first commit
I run git status in the repository folder to quickly see the list of untracked files, then git add . to add everything in the current folder, and then check again using git status. The sample project is now staged. The list of staged files likes good. IntelliJ already generated a .gitignore file, so only the configuration files that we actually want to commit to version control are staged (some project-specific IntelliJ config files, the Maven project configuration, etc.).
Tip: Staging
Never just blindly do git add . followed by a commit. Always check the git status again to see what you actually staged. Depending on the situation, I quickly also check the diff, and potentially some more things, which only takes a few seconds thanks to muscle memory but can save a lot of time by preventing mistakes.
The first commit is often described by a message saying “Initial commit”, but that’s because when creating a new repository on GitHub or other hosting sites, the initial commit really just initializes the repository with a dummy README file and perhaps a LICENSE file. If you create a truly empty repo on GitHub (without README and LICENSE), then there is also no commit and therefore no “Initial commit”. If the first commit is the one that adds the new empty project or a sample project, then “Initialize project” is a much better commit message.
Tip: How to exit Vim
When using Git via the command line, then Vim might be configured by default as the text editor for commit messages. This can be confusing at first, and some people struggle with even closing it. It’s pretty much become a meme that developers end up in Vim by mistake and have to Google how to close it.
While you probably won’t need to become proficient in Vim (unless you want to), I still recommend every developer to know it well enough to be able to write a commit message and successfully confirm the message and exit the editor. The basics are pretty easy.
The tl;dr is that you press Esc to make sure you’re not in INSERT mode, then type “:” to input a command, and then the command “wq” (write and quit). So, Esc + “:wq” + Enter.
Pushing to the remote
I could have created the repository directly on GitHub or another hosting service, or could have added the remote immediately after creating the local repository. In some cases, you might want to use just a local repo and decide much later that you want to host it online, so to demonstrate that case, I now set up the remote when I already committed something locally.
To do that, I create a new empty repository on GitHub (no README and LICENSE files!). Then I configure the remote and push my branch, as shown in the screenshot.
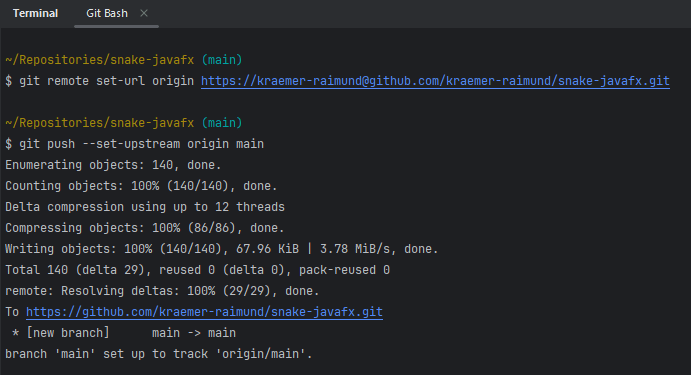
From this point onward you can also follow along with the commit history or just clone the repository and run the code yourself.
Preparing the canvas for drawing 2D graphics
Next I remove all of the cruft from the sample app and keep just the scaffolding. Then I add a simple Pane with a Canvas inside it to the view. This already is almost all I will need as far as the framework is concerned.
For more details you can look into the commit history. In essence, this is the shortlog so far:
$ git shortlog
Raimund Kraemer (9):
      Initialize JavaFX project
      Rename hello-view to snake-view
      Rename HelloController to SnakeController
      Rename HelloApplication to SnakeApplication
      Add uiDesigner.xml to gitignore
      Change title to Snake
      Rename root package to snake
      Prepare view with Canvas for drawing graphics
      Make window non-resizable
As a result I now have a white window, not even worth a screenshot. But it is not empty, although it looks like it. It’s an empty canvas, ready to be filled with life, waiting for its white pixels to be colored using code and math.
To verify that everything works so far, I add the initialize() method to the controller class and draw a rectangle onto the canvas, just to see that everything works.
public class SnakeController {
    @FXML
    Canvas canvas;
    public void initialize() {
        final var graphicsContext = canvas.getGraphicsContext2D();
        graphicsContext.setFill(Color.BLACK);
        graphicsContext.fillRect(100, 100, 80, 40);
    }
}
Test-driving the snake logic
In order to focus on the logic and graphics separately I want to decouple the logic from the UI. I only want the UI to depend on the game logic, not vice versa. That way I’m able to start out with very simple graphics and then iterate over the visual design and graphics without breaking the game logic.
I add JUnit 5 and AssertJ to the POM and add a failing test to make sure that everything is set up correctly.
Initial thoughts
At this point I don’t yet completely know how I will implement it, but I have a general high-level idea—enough to be able to write some tests. The details will evolve step by step. With TDD (test-driven development) I can focus on one thing at a time while still designing some high-level constraints up front.
Some constraints that I want to keep in mind (and would write down on paper if I wouldn’t already be writing them down here right now):
- In order to be easy to test and easy to evolve, the logic should be independent from graphical representation, so I will assume that the snake moves on a discrete grid that is theoretically infinite and practically bounded by the integer bounds.
- In order for the movement logic to be independent from frame rate and CPU clock rate, I will use the concept of a tick, which is a logical step in a game. Each tick makes the snake move one step forward. The snake only executes a tick and is otherwise not aware of anything timing-related.
- I want the snake to fully encapsulate the details of moving its own segments. Some would make a
SnakeServiceand have it do its thing on an array ofRectangles, but we don’t do that kind of stuff here.
I will explore the rest as I go, starting with tests that I think will give me the earliest design feedback.
Basic movement
I start with a simple test for the movement. Remember that with TDD we don’t need to know ahead of time what the API will look like; we choose what it should look like. So I rename the FailingTest class from earlier to SnakeTest (this is not necessarily the final name). Then I write the test in the way I imagine the snake API could look like:
    @Test
    void snakeMovesUp() {
        final var snake = new Snake(
                new Position(0, 0),
                new Position(0, -1),
                new Position(0, -2));

        snake.setDirection(Direction.UP);
        snake.tick();

        assertThatCollection(snake.positions())
                .isEqualTo(List.of(
                        new Position(0, 1),
                        new Position(0, 0),
                        new Position(0, -1)));
    }
This is not final yet, and it doesn’t even compile. Half of the code is red because I haven’t even created those classes and methods yet. But it is the first step towards the design of my snake API. Still, it’s a bit more than I would like to implement in my first test. The smaller the steps the better, especially in the first step. I used this initial test as a sketch to get a better understanding of what the API could look like. Now I delete that code and look for a much simpler first step—the simplest failing test that should be the easiest to make it pass.
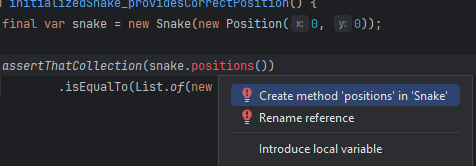
    @Test
    void initializedSnake_providesCorrectPosition() {
        final var snake = new Snake(new Position(0, 0));

        assertThatCollection(snake.positions())
                .isEqualTo(List.of(new Position(0, 0)));
    }
I use the IDE to generate the classes and methods so that it compiles, but I do not implement the “correct” logic yet.
I want to see my test fail first, so that I know that it actually asserts something. Too easily one can make a mistake in the test causing it to pass even before the logic under test is actually implemented. That’s why in TDD we first write a failing test, then make it pass (and then refactor), so that it actually passes because of the tested behavior.
The generated class (with minimal adjustments) that makes the test compile looks like this.
public class Snake {

    public Snake(Position initialPosition) {
    }

    public List<Position> positions() {
        return List.of();
    }
}
Running the test now makes it fail, which is exactly what I want.
org.opentest4j.AssertionFailedError: \
expected: [Position[x=0, y=0]]\
but was: []\
Expected :[Position[x=0, y=0]]\
Actual   :[]
Now I make it pass with the smallest possible change, which is to replace return List.of(); with return List.*of*(new Position(0, 0));. Then I refactor to actually return the snake’s real position.
public class Snake {

    private final List<Position> positions;

    public Snake(Position initialPosition) {
        this.positions = List.of(initialPosition);
    }

    public List<Position> positions() {
        return positions;
    }
}
The test still passes. Time for a commit.
Tip: Commit at least once per TDD cycle
*In each cycle of TDD (test-driven development) we write a failing test, then make it pass with the smallest possible change, then refactor the code while keeping the test (and all other tests) passing. This is known as the *red-green-refactor cycle.
After one cycle, we usually have added some new piece of functionality which we can commit to version control. That way we can continue safely with the next piece of behavior, and if we mess something up, we can easily restore the last “checkpoint” and lose almost nothing. This is also known as the ratchet effect or the rock climbing effect (using the metaphor of being a maximum of a few meters above the last anchor).
Depending on the size of the step and/or the refactoring, I sometimes commit already when the test passes and then amend the commit after the refactoring. That way I can go back to the passing (green) state if I break something during the refactoring step without relying on Ctrl+Z to save my butt or even having to start over with the red phase (the newly added failing test).
To keep things simple, I focus on the behavior of a 1 segment long snake for now, while still thinking ahead enough to use the same API as if the snake were n segments long. I’m basically designing the API for a snake of arbitrary length while using only examples where the snake happens to be 1 segment long.
Now on to the movement. I look for the simplest case to specify with a test. The simplest one I can think of is the default case at the start of the game when no direction has been chosen yet, but the snake moves in any direction by default. There are different ways this could be implemented from a game design perspective. I could make the snake stay still until the player made a direction input; I could choose a random direction; I could allow the initial direction to be passed into the snake upon initialization; or I could choose a direction by default. I will use the last option for now, making the snake move up at the start of the game until the player chooses a different direction. If this design decision changes later, the developer (I, probably) should only have to change this one test, and then make it pass again.
The test looks similar to the previous one, only that now a tick occurs, advancing the snake by one step. There is no way of setting the direction yet, and the test specifies which direction the snake should be moving initially.
    @Test
    void initializedSnake_movesUpwards() {
        final var snake = new Snake(new Position(0, 0));

        snake.tick();

        assertThatCollection(snake.positions())
                .isEqualTo(List.of(new Position(0, 1)));
    }
Again, it doesn’t compile. The tick() method does not exist yet, so I use the IDE to generate the method. As soon as it compiles I run the tests. The new test fails because the snake does not move yet. I switch from the red phase to the green phase of TDD. Time to make the test pass.
In the first step I make the smallest change to make the test green.
    public void tick() {
        positions.set(0, new Position(0, 1));
    }
Then I change it to use the actual position while keeping all tests passing.
    public void tick() {
        final var oldHeadPosition = positions.getFirst();
        final var newHeadPosition = new Position(
                oldHeadPosition.x(),
                oldHeadPosition.y() + 1);
        positions.set(0, newHeadPosition);
    }
Collisions with the wall
Now its time to think about some special cases. What if the snake would hit the wall on the next step? Should the player lose the game if the snake would hit the wall (or its own tail), or should the snake move into the wall first? This not-even-that-special “edge case” (pun intended) of the snake hitting the edge of the screen can already be specified and implemented before the player can even change the direction, because the snake already moves upwards by default.
So how should I include collisions into the API? Some thoughts from the top of my head:
- I’m not considering snakes longer than one segment yet, so self-collision is trivially not possible yet. I can focus on collisions with the walls for now, and on what it even means to collide in terms of the API and game design.
- I could return a boolean from the
tick()method, yielding true in case of a collision. This seems relatively easy to implement, but also a bit hacky and unintuitive. - I could use the result pattern, returning a Success object in the normal case and a Collision object in case of a collision. (Alternatively a simple
Optionalwith the position of the collision, for example.) - I could add a method like
wouldCollide()orcanMove()and thus force the caller to check before each tick. That seems like avoidable temporal coupling. If both methods always need to be called together, then the collision check is part of the movement (or tick). - Throwing an exception in case of a collision seems like a viable option. While it can be argued that the collision is a normal and expected part of the game and thus not really exceptional, I would say that it is still the exceptional case on each tick, and it occurs only once per game, in which case the game is over anyway. So handling the exception becomes equivalent to the game over state.
- I could pass an
onCollision()callback into the snake upon initialization, to make the collision independent from the timing/stepping.
To help me with the decision, I simply write a few different versions of the test to see which API seems best. If one of them feels awkward to use or overly complicated, I discard it.
The test I end up with looks like this.
    @Test
    void snakePlacedNextToWall_collidesWithWallOnTick() {
        final var initialPositions = List.of(new Position(2, 5));
        final var bounds = new Bounds(-5, -5, 5, 5);
        final var onCollision = mock(Runnable.class);
        final var snake = new Snake(initialPositions, bounds, onCollision);

        snake.tick();

        verify(onCollision, times(1)).run();
    }
To mock the callback I added Mockito as a dependency. The way to make this test pass is very simple: I just call the onCollision() callback inside the tick() method of the snake.
    public void tick() {
        final var oldHeadPosition = positions.getFirst();
        final var newHeadPosition = new Position(
                oldHeadPosition.x(),
                oldHeadPosition.y() + 1);
        positions.set(0, newHeadPosition);
        onCollision.run();
    }
In a way this means that the snake always collides, but as long as we haven’t specified what should happen if the snake does not collide, this is good enough. By implementing the actual collision detection at this point, I would not be able to write a failing test for the non-collision case in the next step, and I would be implementing logic that is not specified.
*Tip: Think of TDD as specification by example
*Instead of dogmatic rules like “never write a line of code without a failing test”, simply think of it as implementing unspecified behavior. And why would anyone want to implement behavior that is not part of the (executable) specification? I find that much more intuitive, and it puts the focus on the behavior instead of syntactic details like lines of code. Each test specifies a slice of behavior.
My next test specifies the case where the snake is distant from the wall, and on tick() it should not collide, i.e., the onCollision() callback should not be called.
    @Test
    void snakePlacedDistantFromWall_doesNotCollideWithWallOnTick() {
        final var initialPositions = List.of(new Position(13, 37));
        final var bounds = new Bounds(-1000, -1000, 1000, 1000);
        final var onCollision = mock(Runnable.class);
        final var snake = new Snake(initialPositions, bounds, onCollision);

        snake.tick();

        verify(onCollision, never()).run();
    }
This test fails, because currently the snake always collides (i.e., it always calls the callback in the tick() method). I make it pass, then simplify the implementation. The result looks like this.
    public void tick() {
        if (stepWouldCollide()) {
            onCollision.run();
        } else {
            step();
        }
    }

    private boolean stepWouldCollide() {
        final var oldHead = positions.getFirst();
        final var newHead = new Position(oldHead.x(), oldHead.y() + 1);
        return newHead.y() > bounds.top();
    }

    private void step() {
        final var oldHead = positions.getFirst();
        final var newHead = new Position(oldHead.x(), oldHead.y() + 1);
        positions.set(0, newHead);
    }
In other words, on tick the snake either makes a step or it collides with the wall.
Eating food and growing the snake
When the snake eats the food, it grows by one segment, so this is where I will introduce multi-segment snakes. I could instead add the different directions next, but there is not one single correct order in which to add all of the functionality; there are different advantages to each strategy.
Some thoughts about the eating/growing logic:
- Should the snake grow at the front or at the end of its tail?
Growing at the front could mean that eating the food results in a collision, depending on how it is implemented, and it just seems more logical to me in general that the snake’s tail gets longer rather than its head “growing forward”. - Should it grow immediately when it eats the food, or after the next tick?
Growing immediately could result in the tail growing into a wall or into itself in some situations. Also, the tail does not really have a direction, especially when the tip of the tail (i.e., the last segment) just moved around a corner. Only the snake’s head has a direction, and the other segments just follow the same path. The solution that makes the most sense to me from a game design perspective is to have the snake grow on the next tick after it just ate the food. - Should the snake know where the food is, or perhaps even place it randomly itself?
This does not seem like something the snake should be concerned with. To keep things simple, I would like the snake to not even know that the food exists, and to simply tell it to grow as needed.
I specify that the snake grows on the next tick using this test.
    @Test
    void snakeGrowsOnNextTick() {
        final var snake = new Snake(new Position(5, 5));

        snake.grow();
        snake.tick();

        assertThatCollection(snake.positions())
                .isEqualTo(List.of(
                        new Position(5, 6),
                        new Position(5, 5)));
    }
The (slightly hacky) implementation that makes it pass is this.
    public void grow() {
        positions.add(positions.getFirst());
    }
Basically I am just duplicating the first (and only) segment. This only works for now because we are still only starting with a single-segment snake that never moves more than one step and only moves its first segment/head, and we have not yet specified that it should not grow before the next tick. But for the current specification this works fine. Note how I won’t have to change existing tests as I add new behavior; I only have to add additional tests and make small (incremental and evolutionary) changes to the implementation. The implementation becomes more general as the tests become more specific. This is how the tests drive the design without specifying implementation details. There are many different ways we could have made this test pass, which we will see in the next steps, but this one was the simplest I came up with.
Part 2 coming soon finally arrived.